Importing Templates
Import from Folder
You can import templates from older installations or import templates that you have created externally with other editors.
To start importing, you need to arrange your template files into a folder. That is, one file for each of the 3 supported formats - Rtf, Html, Txt
Optionally you have also got a campaign folder with 2 campaign file in Html and Txt with accompanying images inside this folder
If you do not have a campaign folder, the importer will create one for you.
Here is the list of required files for importing. The 3 files outlined in red are the mandatory ones.
·template.html
·template.txt
·template.rtf
·logo.gif (or any images you use)
·campaign (folder)
·campaign.html
·campaign.txt
·banner.gif (or any images you use)
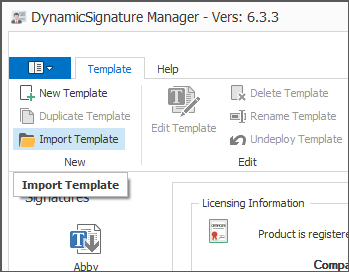
Choose the importer from the tools menu:
Select to import from folder:
.png)
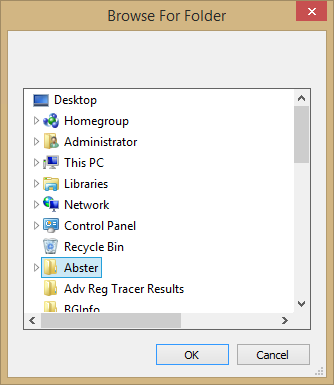
Point out the folder from which your want to import:
If you import from a version 5.x template your campaign folder will be called "HTML". You should rename that to "campaign" before importing.
If a campaign folder is not present, that is ok, the importer will create a dummy campaign for you.
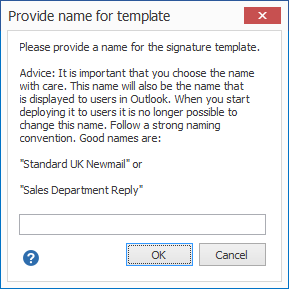
Then you will be asked for a name to give the template. Keep in mind that the name is important since this will be used in Outlook on your client PCs.
Import from Package
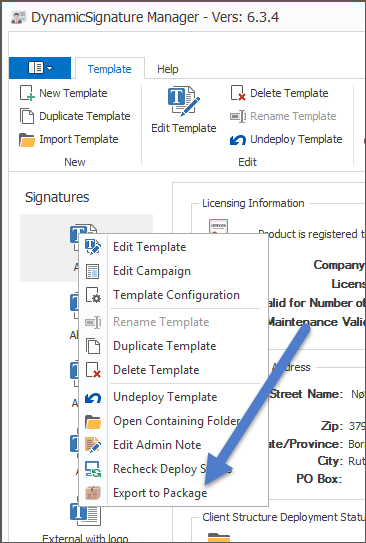
As of v.6.3.4 there is an option to import from a package created from another DS-Manager installation using the "Export to Package" option.
(Right-click a template in the list and choose "Export to Package)
This new option can be used as a backup/restore method or template interchange method.
Importing a template that is not already present on your installation, a new template will created. If you restore a template that already exist it will be overwritten with the imported version.

Manually Import
This method is not recommended.
The Template Repository on the machine that you have install DS Manager on, is comprised of files only. There is no database involved.
When the DS Manager starts it will index the repository for templates.
So if you place your old templates in to the repository in a way that follows the expected structure, then you can just restart the DS Manager and it will add the template to the list on the user interface.
You will not be able to retain your old settings from version 3.x and 4.x because the ini files have new structure. So you must use a blank default configuration file instead.
Here is how it is done:
Collect your 3 template files and corresponding images into a folder.
Give the folder a name with no spaces in. You can rename the template later on.
Example:
Create a folder called StandardUKNewMail (There is no spaces in it)
Add the three templates, and make sure they are called template.rtf / template.txt / template.html
Add images into this folder. Not in a subfolder like "images"
Add the "campaign" folder, and add the campaign.html file to that. And change the name if it was called something else before. Add images as needed.
So the end result is like this:
·StandardUKNewMail
·template.rtf
·template.txt
·template.html
·logo.gif (or what images you use)
·campaign (folder)
·campaign.html
·campaign.txt
·banner.gif (or what images you use)
Copy the prepared folder to the repository in C:\Programs\DynamicSignature\DS Manager 6\Templates
Then copy the "Default.ini" from C:\Programs\DynamicSignature\DS Manager 6\Masters
into the C:\Programs\DynamicSignature\DS Manager 6\DS Client folder
Rename it to the same as the template folder you just created, e.g. StandardUKNewMail.ini
Then open it with notepad and change these two parameters for
SignatureFileName=StandardUKNewMail
ServerUNCpath=C:\Programs\DynamicSignature\DS Manager 6\Templates\StandardUKNewMail
Now when you start DS Manager it will go over all the ini files present, and it will find this new one. From that it will find the path to the folder of your templates, and the name of it. If you were not happy with the name of it, you can just right-click it in the list and choose rename.
Continue with your other templates if you got more
IMPORTANT:
If you rename the imported signature to be the same as was in the parameter "SignatureFileName=" in the old ini file, then when you deploy it with the new product, it will overwrite the signatures on the client PCs.
Otherwise it will create a new signature, and leave the old one, which it the same more or less. Just a matter of clutter control.