Cloud Services Client
You should download and install the cloud client onto end-user computers (from our Customers Area) to have them receive your published signatures.
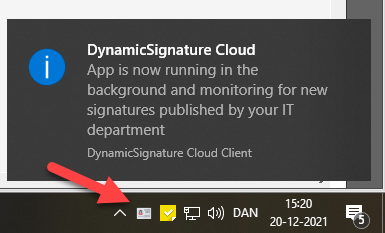
The client will automatically check every day to see if there are any updated signatures to receive. It will run in the background and it can be accessed from the taskbar area.
(To load balance the traffic in the early morning, the client will automatically download and install published signature within 2 hours after the user start the computer)
Normally users do not need to use the UI as signatures will automatically be downloaded once every day. Users can use the UI to manually download signatures, if they do not want to wait for the next scheduled check. (Double click icon to bring up the UI)
The client will automatically check Outlook for installed accounts and fetch signatures published for those. There are no configuration options other then the checkbox for disabling automatic download.
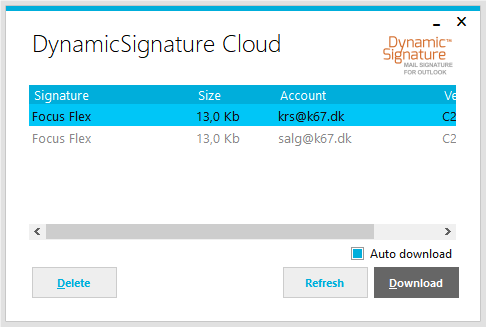
The UI of the Cloud Client.
Delayed Fetch
When a user logs on to his/her computer the Cloud Client will automatically start and begin monitoring for new signatures. To distributed the heavy morning traffic a little the process will find a random time to download inside the first 2 hours after start.
It will check every 24 hours to see if any new or modified signatures are available.
Installing
To install the application on many computers at once you can use the silent msi installation feature.
msiexec.exe /i \\SHARE\CloudClientSetup1.0.2-x64.msi /QN /L*V "C:\Temp\msilog.log"
Quick explanation:
/L*V "C:\Temp\msilog.log"= verbose logging
/QN = run completely silently
/i = run install sequence
Upgrading
Newer versions of Cloud Client will automatically remove the previous version. When you run the installer the previous version will most likely already be running. If that is the case the installer can't make the upgrade without a restart. To alleviate this need you can use the Windows TASKKILL command before the msi installer runs.
You terminate any running version with following command:
taskkill /IM DS-CloudClient.exe
Then run the installer silently with above msiexec command.
A few useful commands.
In powershell you can check a running process version with:
Get-Process -Name "DS-CloudClient" | Format-list -Property ProductVersion
Output> ProductVersion : 1.0.2.29284
Powershell install script
The following script could be used to deploy the client.
It will first check is a previous version is presently running and if so it will close it and install new version.
Instead of querying the WMI which is very slow, it instead check the running processes. This should work well since the Cloud Client is a background process and should always be running if installed.
#Put the current version of the product you are wanting to install
[version]$this_ver = '1.0.3'
$installedversion = Get-Process -Name "DS-CloudClient"
#If process was found
if ($installedversion -ne $null) {
Write-Output 'Found version' $installedversion.ProductVersion
if ($this_ver -gt $installedversion.ProductVersion) {
Write-Output "Old version found"
'Closing program'
taskkill /IM DS-CloudClient.exe
'Installing new version'
msiexec.exe /i \\SHARE\CloudClientSetup1.0.2-x64.msi /QN /L*V "C:\Temp\msilog.log"
} elseif ($this_ver -eq $installedversion.ProductVersion) {
Write-Output "Latest version already installed"
} else {
Write-Output "Newer version found"
}
} else {
#No program was running so go ahead with regular install
msiexec.exe /i \\SHARE\CloudClientSetup1.0.2-x64.msi /QN /L*V "C:\Temp\msilog.log"
}