
Impersonation
The following should only be performed by an IT-administrator. If you are working in Branding or Marketing and are not knowledgeable about IT-administration, please refer to the IT Department for help.
The DSBS is running as “Network Services” and therefore do not have permissions to change signatures on behalf of users.
For the job to be able to send signatures to Owa / Office365 you must add an account that has Application Impersonation permissions on the Exchange installation.
However, before you can enter and test the impersonation setup you must create this account, and grant it permissions.
Office365 – Setup UI Method
Granting of permissions has transitioned to OAuth2 in the 2.0.2 version of DS Batching Service.
The DSBS service now has an AppID that is registered in AzureAD. When communicating with Office365 it will ask for access token using this AppID.
If you have DS-Manager lower than 6.7.0 you should upgrade to see the new setup dialog.
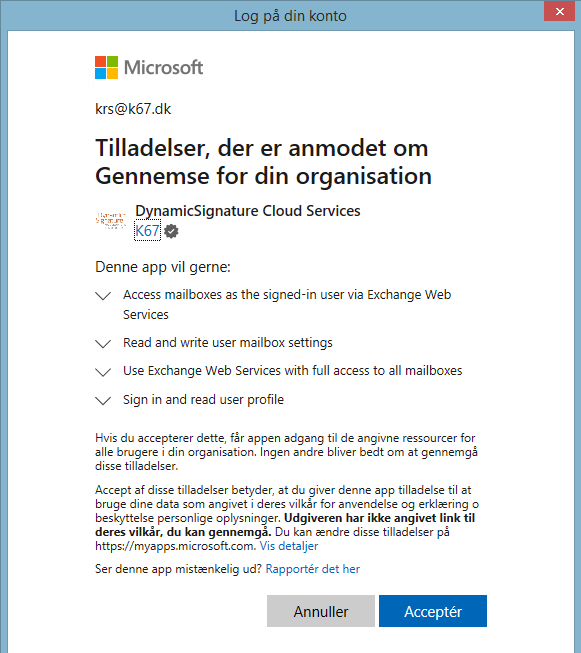
To setup permissions for DSBS to push signatures onto your Tenant you need to grant it Admin Consent. so it can access the mailbox settings of your users. To do this use the consent form from the system menu.
Then logon with a global admin account. Then check and accept the permissions require.
The Service Principal is now registered in your tenant. You can verify this by going to AzureAD and then to Enterprise Application. There you can search for “DynamicSignature Cloud Services”.
.png)
That is all you need to do.
To revoke this permission you can at any time delete the SP from your tenant.
.png)
EWS using user name & password On-Prem
PowerShell:
In Active Directory create an account called e.g. BatchPush. A good place for that is in the “Users” container.
Start PowerShell and run the following command:
New-RoleGroup -Name "DynamicSignature" -Roles "ApplicationImpersonation","View-Only Recipients" -Members batchpush
If you later on wish to revoke the permission you can use:
Remove-RoleGroup -Identity DynamicSignature
GUI:
(Deprecated for Office 365. Now moved to Modern Authentication (OAuth2))
a. Create User Account
First start by creating a regular user account, without a mailbox. This does not need to have any special rights or belong to any group. You can call this account for BatchPush or any other name you prefer. Since this is a system service account you may want to put it into an OU like "Users".
If you are using Azure AD (e.g. hybrid) then preferably create the account there, because then you do not need to wait for a syncronisation to occur, before the account is visible in ECP.
b. Assign rights
Using Exchange Control Panel it is now possible to set up this impersonation account.
Go to https://youexchange/ecp
Then go to "Permissions" -> "Admin Roles", and choose to add an Admin Role.
Call this "DynamicSignature", and assign the "ApplicationImpersonation" + "View-Only Recipients" roles
Then add the member account you have create. BatchPush or what you called it.
Then save.
A group will be created in "Microsoft Exchange Security Groups" OU, with these settings.
.png)