.jpg)
First Run
When you run the DS Manager for the first time, you need to set up your environment before you can start editing templates and deploying them.
Here is how it looks:
Adding License
First add either a trial license or a valid license that you have obtained from a reseller, or from www.dynamicsignature.com
Adding DSHQ
To reduce the amount of redundant data in Active Directory, DynamicSignature uses a Contact in AD to hold all the address information for users, instead of adding this information to each user. If you have several physical locations you can make more contacts and mark-up your users with these locations.
More on the subject of addressing
Choose "Add Address" to create an HQ address to use with DynamicSignature. A new Contact called DSHQ will be created inside a new OU called DSAddresses in the root of your domain.
.png)
You can do it manually also in the MSC: "Users & computers".
Then just restart DS Manager, and it will pick up the new DSHQ contact so you can proceed.
Note: It is not possible to have the OU DSAddresses reside inside another OU. It must be in the root of you domain.
Also, if you create it manually please observe the numbers of s's in the wording. It easily gets confusing.
If you need to have this placed somewhere else in your tree, please contact our support and we can give you instructions.
Choosing Deployment Server
To deploy signatures, the DS Manager will place Client binaries and template files in folder called DynamicSignature inside the NETLOGON folder of a domain controller OR a Shared Folder of your choice.
All the necessary parts for deploying signatures to your client will be structured inside this folder and maintained by you through the DS Manager.
.png)
You will be presented with a list of domain controllers in you domain. You can choose any of them. Remember that all content in the NETLOGON folder will automatically be replicated to all other domain controllers by the windows server itself.
You are also free to enter a UNC path to a network share of your own choosing should you want that. Make sure that permission has been set up correctly so that you have Full Control and regular users only have Read.
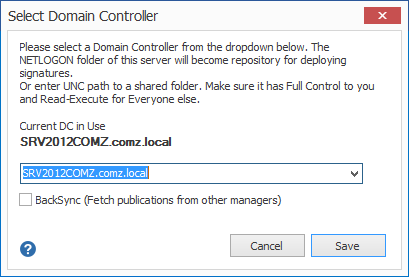
In the future DS Manager will always use this server as a share for deploying. You can choose another later on, should it be removed from production.
Deploying the DS Client components
When you have assigned a deployment server to your installation, you next need to deploy the DS Client Application. Later on, when you want to roll out signatures in your organisation, you will create a Group Policy that in turn will call a small client application that actually creates the personalized signatures based on your templates. When you choose "Publish to Share" it will create the folder structure in the the share chosen above.
.png)
The folder structures in deployment share
When you deploy the DS Client Binary a folder called DynamicSignature will be created and all future content will be placed inside this folder. (And will not conflict with any of your existing items in NETLOGON)
Here you can see an example of the structure that is created.
.png)
If you by any chance already have a folder called "DynamicSignature" in the NETLOGON folder it will detect that and warn you before proceeding. You could have been upgrading from an earlier version.
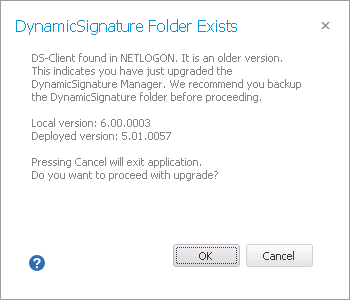
The DS Manager will automatically try to detect the structures of the folder and determine what version of DS Client is located there if any.
In the above dialogue it has detected that the DS-Client is present in an older version, and propose to upgrade it.